
Welcome to the third installment of The G’s guide to Synthwave Patch Creation! (New readers, please check out our previous tutorials: Juno-style polysynth for TAL U-No-Lx and resonant bass for Diva and PG-8X.) This week we have the illustrious Jonathan Nicol on board with a fantastic lead patch. Jonathan is the genius behind Oblivion Sound Labs, who currently offer an excellent Juno 60-style chorus VST and a great synthwave-inspired Diva soundbank–absolutely free. He’s also my go-to guy whenever I get stuck and need some advice on patch creation. So without further ado, over to Jonathan! -G
Memorable synthesizer solos are a feature of many great synthwave tracks. In this tutorial I will show you how to create an classic analog style lead in Diva, an excellent virtual analog synth from U-He that models several well known hardware synthesizers from the late 1970s and 1980s. I will also show you how to program a similar lead in Synth1, which is a great alternative if you don’t own Diva.
1. Patch initialization
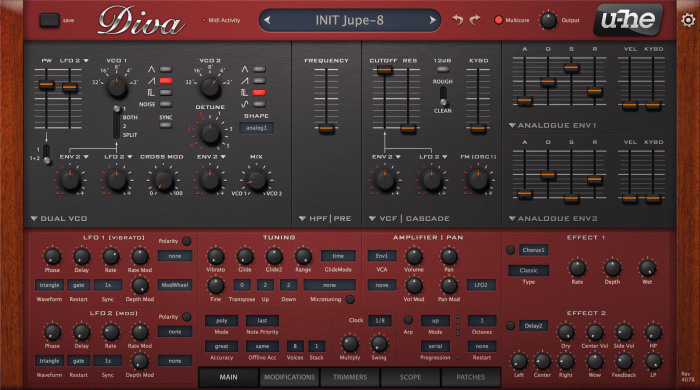
After launching Diva navigate to the Patches tab and in the directory tree open the folder named “8 Templates”. This folder contains initialization presets for each of the different synths that Diva models. In the upper pane click the preset named “INIT Jupe-8” to configure Diva to emulate Roland’s Jupiter 8 synthesizer. Switch back to the Main tab and here’s what you should see:

2. Oscillators
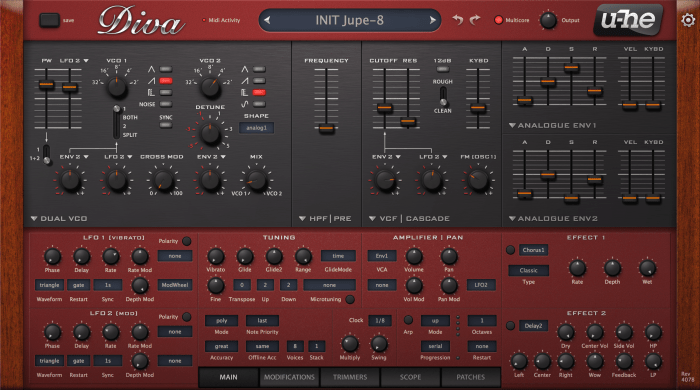
In the Dual VCO section change VCO 2 to a square wave and set its tuning to 4 feet, so that it plays an octave above VCO 1. We can make the square wave less “woody” sounding by increasing its pulse width to 75. We can also add some movement to the sound by modulating its pulse width with a low frequency oscillator (LFO). Change the rate of LFO 2 to -2.20, then increase the pulse width modulation slider (next to the PW slider) to 20. If you play your patch now you will notice that its character changes over time, thanks to the pulse width modulation. At the moment the square wave is too prominent, though, so turn the MIX knob to 15 so that it is more subtle.
3. Filter
Lets concentrate on the filter section. Set the filter CUTOFF to 72 and resonance (RES) to 12. The cutoff determines how “dark” or “bright” our sound will be, and a touch or resonance adds some “shine”. We can further shape the filter using an envelope (more on that in the next step) and LFO. Underneath the filter cutoff slider are two knobs for modulating the cutoff, the first assigned to Envelope 2 and the second assigned to LFO 2. Turn the first knob to 68 and the second to 8. Next increase the KYBD slider to 35. This sets the keyboard tracking amount, so that the filter becomes more prominent as you play higher notes on your keyboard. Lastly, turn the FM knob to -9 to add a little crunch to our sound.
4. Envelopes
At this point our patch sounds more like a pluck than a lead, but we can address that by adjusting Diva’s ADSR (Attack Decay Sustain Release) envelopes. By default ENV 1 shapes the sound’s volume and ENV 2 shapes the filter’s cutoff frequency. Set The Attack of ENV 1 to 14, its Decay and Sustain to 100 and its Release to 23. Turn the VEL (velocity) slider for ENV 1 to 35 so that the patch is a little quieter when you press a key gently. Now lets turn our attention to ENV 2. Set its Attack to 9, Decay to 100, Sustain to 0 and Release to 27. The interplay between the envelope and filter cutoff is where the magic happens in most synth patches, and although our envelope is very basic you can still hear that our new settings dramatically affect our sound, especially when playing sustained notes.

5. Polyphony and Tuning
At the moment our patch is polyphonic, so if you press multiple keys simultaneously the notes will overlap which sounds sloppy during fast solos. To fix that, set the Mode to mono in the Tuning section. The patch sounds a lot cleaner, but now the transition between notes is too abrupt. Let’s add some glide (portamento) to ease the transition between notes. Set Glide 1 to 16.50, and play some notes. Sounds cool, right? We can make our patch even more expressive by adding some vibrato. Change the Vibrato knob to 45% and the Rate knob of LFO 1 to 2.60. You won’t hear a change immediately, but if you turn the mod wheel on your midi controller you can achieve a nice vibrato effect which can add a lot of character to your performance. You may also want to turn the main volume knob down a little too, so that the patch doesn’t clip in your DAW.

6. Unison
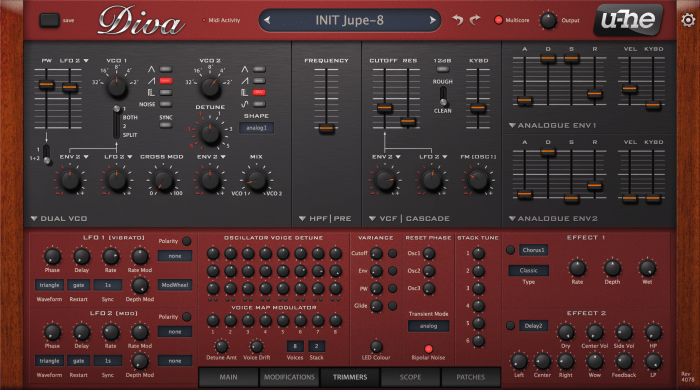
Let’s fatten our sound up by adding unison, so that each time you play a note two synthesizer voices are triggered instead of just one. Near the bottom of the Main tab is a knob labelled Stack. Set it to 2 to double the number of voices. That makes our sound more complex, but because both voices are tuned identically they will clash with each other. To remedy that, hop across to the Trimmers tab and hold down Shift while turning the the Stack Tune knob for voice 2 so that you can adjust its value in very small increments, and set it to 0.07. This puts our voices very slightly out of tune with each other to create a nice phasing effect. Switch back to the Main tab and in the Amplifier/Pan section set Pan Mod to 60% and choose StackIndex for the modulation source. Now each voice is positioned differently within the stereo field which gives the patch some stereo width.

7. Effects
We have baked our cake, now lets add some icing! Diva has some great onboard effects and we will use its delay and reverb modules to add space and richness to our patch. Select Delay for the first effect slot, and turn the Side Vol knob to 17%, Left delay time to 4.0, Feedback to 20% and LP to 50%. When you hit a note on your midi keyboard you should hear distinct echoes following the main sound, which adds a rhythmic vibe to our instrument. Select Plate for the second effect slot to add a reverb after the delay. Set Dry to 100, Wet to 43, Damp to 85, Decay to 38 and Size to 90. Effects are very much a matter of preference, so feel free to experiment with the effect settings or use different effects entirely.

Remaking the patch in Synth1
Even if you don’t own Diva it is straightforward to program a similar patch in most synthesisers. The screenshot below shows settings for a nearly identical lead in Synth1, a very impressive freeware synthesiser by Ichiro Toda. Synth1 doesn’t have an onboard reverb effect, but you can add your reverb of preference to your effects chain.

That wraps up the tutorial. Have fun ripping some blistering synth solos with your new lead patch!
-JN
