Blog

Synthwave Artists Pick Their Top Releases of 2017

PhotoFunia-1514271921

Happy Holidays! To celebrate the end of the year, I’ve asked some of my fellow synthwave producers to stop by and share their favorite releases of 2017. What you’ll see is a diverse cross-range of what the genre has to offer, from surprise new albums from beloved and well-established artists, to dynamic debuts from up-and-coming producers. -G

Vampire Step-Dad: Retroglyphs – Retroglyphs

I did a bit of thinking before I could make a statement like “Best Synthwave Album of 2017”, but in truth, the decision is pretty easy.

I ran into Retroglyphs on Twitter in February 2017, when they were just 3 months old. On first listen, I was impressed that they were a real band, and that they had really captured that 80’s pop sound VERY well. It wasn’t until later, in August when they put out their first album, the eponymous “Retroglyphs” that I heard “One More Kiss” and I was hooked. Preceded by “Wild Road”, I was very excited to hear what the rest of the album was going to bring me. What follows is well thought out rollercoaster of emotions and sounds. Starting out pepped up and happy, the album takes a turn for the dark, sadder side of things, and even dips in some angry, frustrated tirades. And each song starts with a hook you’ll be singing to yourself for the rest of the day. This is a truly solid album that I’ve listened to on repeat many times since August.

I really look forward to seeing where these guys go with their sound, and I sure as heck hope I can share a stage with them some day.

Check out Vampire Step-Dad’s latest, Nightshift!

Syntax: Droid Bishop – Lost in Symmetry

Traveling through the dimensions of space, time and speakers, an entity known as Droid Bishop created a world of pure unadulterated joy for lovers of all things synthesizer years ago. The depth, maturity and complex nature of Droid’s melodic and ornate output created a deep sense of respect and admiration for those in the then burgeoning synthwave community. The emotive nature of each chord progression through an arpeggiated wonderland of twists and turns in each track coupled with welcoming warm pads, impressive percussion and dynamic changes and bridges immediately display a proficient producer who manages to effectively draw on the sensibilities with such a retro yet completely modern vibe. His understanding of song structuring and inspiration is impressive and deep, as each track yields such a unique identity and feel. And let’s face it, Droid Bishop has to be the best synth based moniker in recent times.

Droid Bishop’s Lost In Symmetry is a shining example of this powerhouse producer’s work. Delving into uncharted terrain with complexities and moods which garner the strongest of feels and emotions radiate through the release. From slower ballad type compositions to his signature driving synthwave, the journey in sound is remarkable and is without a doubt the strongest and most lasting release of the year. Do yourself a favor and add this wondrous work of art to your stereo collection. Whether you are serenading a loved one, impressing a friend for the first time, or driving the streets at night feeling invincible and vulnerable, the release has it all. 10/10

Facexhugger: The Encounter – Bad Mood

Starting off the album with Behemoth IV sets the tone for the album and it doesn’t let up. This has been in heavy rotation for me since it’s release.

Check out Facexhugger’s latest, Chasing Replicants

The G: FM Attack – Stellar

Picking a favorite synth record for 2017 is tough, because there are a few I’ve really enjoyed. But in the end, 2017 was the year we got a new FM Attack album.

Stellar is an evolution of the sound FM Attack developed on Deja Vu and Dreamatic. While FM Attack has always incorporated diverse influences, from post punk to house, Stellar takes another step away from the core tropes of synthwave. It is especially notable for its use of guitar as texture, as well as its decidedly introspective tone. But in the end, the warm vintage synth tones still take center stage.

This one’s a slow burner–an album that gets better with every listen. If you want synthwave that pushes boundaries, this is a good place to start.

Check out The G’s latest, Cosmopolis

Vandal Moon: Drab Majesty – The Demonstration

Drab Majesty’s latest LP “Demonstration” brings a new level of sacredness to new wave & postpunk music. It’s a perfect record from beginning to end, and pays tribute to everything that came before. Romantic vocals, shimmering guitars & synthesized beauty.

Check out Vandal Moon’s latest, Teenage Daydream Conspiracy

Computronic: Michael Oakley – California

The first thing that grabbed me about Michael Oakley’s new album California is how “easy” the music and vocals sound together–as though no effort was needed to make it sound so naturally perfect. It’s the kind of music that, as a music producer, I hate to listen to because it makes me question my own skills as an artist. Having said that, I can’t stop listening to this album.

This is what happens when a music producer is not only a talented musician but a damngood singer as well. You get the essence of the artist in each track. A complete expression of their nostalgic look back on their teenage self. This album brought me back to lying on the grass with my walkman on and staring at the sky, driving my first car on the highway and feeling that spike in my heart when I would hold a girl’s hand for the first time.

California is pure nostalgic emotion. My only complaint is that there aren’t enough songs. I feel like the lights have been turned on at the dance and I don’t want to go home yet.

Check out Computronic’s latest, Even the Score!

Night Raptor: The Midnight – Nocturnal

When I first listened to “Crystalline”, it just made sense to me. From the shakers mimicking a train pulling into the station to the crystal neon rain droplets cascading throughout the song, it just all made sense. The whole album makes sense.

Nocturnal is a very well-produced audio journey into neo-noir streets–and there is honesty in the writing that is felt. My two favorite tracks from the album are “Shadows” and “Light Years” (feat. The wonderful Nikki Flores). “Shadows” is a driving composition, complimented by a story of the darkness that resides within us that could rear its ugly head at any moment. There is a deep truth and understanding to this that I feel I can relate to. Being human, we can all make regrettable mistakes that will follow us forever like shadows underneath. “Light Years” offers us some solace in its melancholic arms telling us it will be ok, that eventually we will find that feeling lost long ago.

Nocturnal is a masterpiece of a Synthwave album and is powered by this nostalgia of feelings long lost or artificially created in memories. It will immerse you in its warm synths and addicting saxophone, so thoughtfully played by Thomas Edinger (it really does tie all the tracks together well, weaving its way in and out of them like some neon lit serpent). The lyrics and sincere tone of voice will stir your emotions and bring them out into the open. Get lost in this beautiful music and let it inspire you.

Check out Night Raptor’s latest, Night Raptor EP

Dreddd: Hello Meteor – Pantropic

My favorite album of the year is pretty tough to nail down, as The Midnight and Perturbator were strong entries for the genre of synth to the wave. BUT…out of left field, my favorite album was Pantropic by Hello Meteor. From the very first note to the last, it’s a master class in music, from amazing sweeping melodies, deep soundtrack vibes, and some of the overall best vibes out there. I’ve never listened to a record that described my experiences with each track. I mean, alot of what makes the album amazing is that every song is like a really good memory, and it really makes you feel. Honorable mentions to Skeleton Beach, and The Crusader.

Check out Dreddd’s latest, The Heavy Album


Echosynthetic’s Producer of the Year Award

synthy-awards-bandcamp-john-fryer-poty

So I woke up to a wonderful piece of news today: synth blog Echosynthetic awarded me the John Fryer Producer of the Year Award!

Your first questions may be “who’s John Fryer, and why is this award named for him?” Fryer is a founding member of goth/dreampop collective This Mortal Coil, as well as a famous producer. He’s worked with an incredible number of synth-based artists I hold near and dear, including Depeche Mode, Yazoo, Clan of Xymox, Wire and Nine Inch Nails.

In Echosynthetic’s words:

What better way to frame this award than by naming it after one of the all time great record producers, John Fryer. His work in the studio has touched just about every single person who enjoys synthpop, EBM, new wave, or industrial music, whether you know it or not.

So winning an award named after Fryer is an incredible honor in and of itself. But Echosynthetic also had this to say about my work as producer and mastering engineer in 2017:

As I was sitting down to make a short-list of nominees for Producer of the Year, one name kept popping up on some of the best releases of the year. Not just quality records…no, I mean records that helped define synthwave in 2017.

Most creative types tend to be endlessly self-critical, and I’m no exception. Somewhere, deep down, you always doubt whether your stuff is good enough. Knowing that people connect with the work I do never ceases to amaze me, and could never get old. I’m incredibly grateful to Echosynthetic for this honor, as well as to all my mastering clients for believing in me and letting me work on their amazing music. And last but not least, a big thank you to all the people who have bought, streamed or otherwise supported my music over the past two years. I owe each and every one of you a debt of gratitude.


3 Releases with The G

I’m a firm believer that, for any musician, listening widely is as important as listening deeply). So I’ve been taking a break from synthwave and seeing what else gets me moving. Lately that’s been techno and house, and specifically, a mix of classics and some of new artists doing throwback stuff (also sometimes referred to as lo-fi). Here are a few releases I’ve got on heavy rotation right now.


1. Peggy Gou – Seek for Maktoop [Technicolor, 2017]

I first discovered Gou, who is originally from Korea but now based in Berlin, by accident. I was trawling YouTube for lo-fi stuff and hit on “Jen High,” a quirky, playful deep house cut. Her latest, Seek for Maktoop, jettisons the lo-fi house approach for a more romantic, Detroit-inflected style of techno. But what’s really great about Gou is that, even as she references the classics, her stuff sounds fresh and innovative. The best of both worlds! Top cut: “Maktoop”


2. DJ Windows XP – Sometimes I Feel Happy, Sometimes Sad [Who’s Susan, 2017]

I’ll admit, at first I was just in it for the name. But the truth is that, ridiculous as it sounds, DJ Windows XP may be the best house producer around right now. Every track is jam-packed with feeling. Top cut: “Maybe It Was Me.”


3. Palms Trax – Equation [Lobster Theremin, 2013]

Still my favorite release on the too-cool-for-school label Lobster Theremin. At first, Equation feels almost simplistic, but that belies a melodic complexity that emerges on repeat listen. Top cut: “Late Jam.”

TUTORIAL: Classic analog lead with Diva and Synth1

Welcome to the third installment of The G’s guide to Synthwave Patch Creation! (New readers, please check out our previous tutorials: Juno-style polysynth for TAL U-No-Lx and resonant bass for Diva and PG-8X.)  This week we have the illustrious Jonathan Nicol on board with a fantastic lead patch. Jonathan is the genius behind Oblivion Sound Labs, who currently offer an excellent Juno 60-style chorus VST and a great synthwave-inspired Diva soundbank–absolutely free. He’s also my go-to guy whenever I get stuck and need some advice on patch creation. So without further ado, over to Jonathan! -G

Memorable synthesizer solos are a feature of many great synthwave tracks. In this tutorial I will show you how to create an classic analog style lead in Diva, an excellent virtual analog synth from U-He that models several well known hardware synthesizers from the late 1970s and 1980s. I will also show you how to program a similar lead in Synth1, which is a great alternative if you don’t own Diva.

1. Patch initialization 

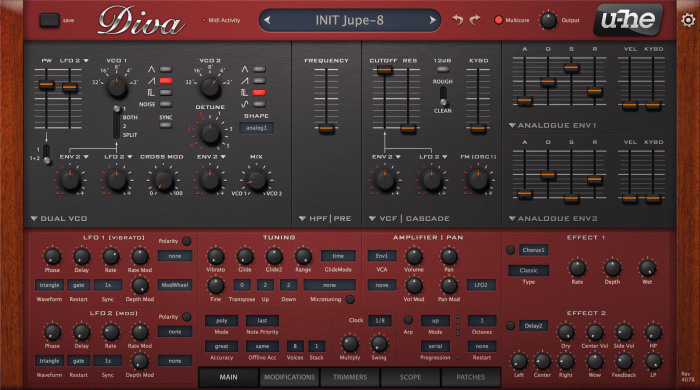
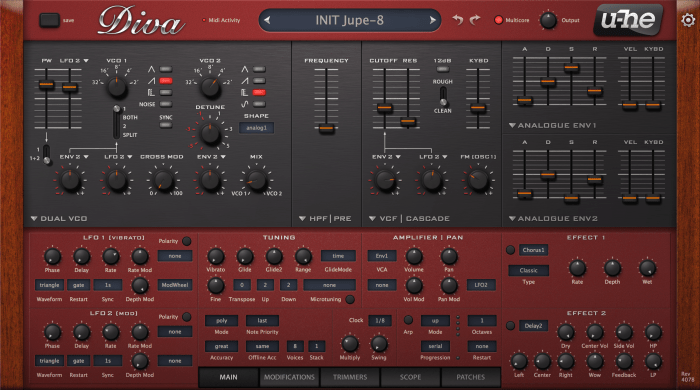
After launching Diva navigate to the Patches tab and in the directory tree open the folder named “8 Templates”. This folder contains initialization presets for each of the different synths that Diva models. In the upper pane click the preset named “INIT Jupe-8” to configure Diva to emulate Roland’s Jupiter 8 synthesizer. Switch back to the Main tab and here’s what you should see:

step1

2. Oscillators 

In the Dual VCO section change VCO 2 to a square wave and set its tuning to 4 feet, so that it plays an octave above VCO 1. We can make the square wave less “woody” sounding by increasing its pulse width to 75. We can also add some movement to the sound by modulating its pulse width with a low frequency oscillator (LFO). Change the rate of LFO 2 to -2.20, then increase the pulse width modulation slider (next to the PW slider) to 20. If you play your patch now you will notice that its character changes over time, thanks to the pulse width modulation. At the moment the square wave is too prominent, though, so turn the MIX knob to 15 so that it is more subtle.

step2

3. Filter 

Lets concentrate on the filter section. Set the filter CUTOFF to 72 and resonance (RES) to 12. The cutoff determines how “dark” or “bright” our sound will be, and a touch or resonance adds some “shine”. We can further shape the filter using an envelope (more on that in the next step) and LFO. Underneath the filter cutoff slider are two knobs for modulating the cutoff, the first assigned to Envelope 2 and the second assigned to LFO 2. Turn the first knob to 68 and the second to 8. Next increase the KYBD slider to 35. This sets the keyboard tracking amount, so that the filter becomes more prominent as you play higher notes on your keyboard. Lastly, turn the FM knob to -9 to add a little crunch to our sound.

step3

4. Envelopes 

At this point our patch sounds more like a pluck than a lead, but we can address that by adjusting Diva’s ADSR (Attack Decay Sustain Release) envelopes. By default ENV 1 shapes the sound’s volume and ENV 2 shapes the filter’s cutoff frequency. Set The Attack of ENV 1 to 14, its Decay and Sustain to 100 and its Release to 23. Turn the VEL (velocity) slider for ENV 1 to 35 so that the patch is a little quieter when you press a key gently. Now lets turn our attention to ENV 2. Set its Attack to 9, Decay to 100, Sustain to 0 and Release to 27. The interplay between the envelope and filter cutoff is where the magic happens in most synth patches, and although our envelope is very basic you can still hear that our new settings dramatically affect our sound, especially when playing sustained notes.

step4

5. Polyphony and Tuning 

At the moment our patch is polyphonic, so if you press multiple keys simultaneously the notes will overlap which sounds sloppy during fast solos. To fix that, set the Mode to mono in the Tuning section. The patch sounds a lot cleaner, but now the transition between notes is too abrupt. Let’s add some glide (portamento) to ease the transition between notes. Set Glide 1 to 16.50, and play some notes. Sounds cool, right? We can make our patch even more expressive by adding some vibrato. Change the Vibrato knob to 45% and the Rate knob of LFO 1 to 2.60. You won’t hear a change immediately, but if you turn the mod wheel on your midi controller you can achieve a nice vibrato effect which can add a lot of character to your performance. You may also want to turn the main volume knob down a little too, so that the patch doesn’t clip in your DAW.

step5

6. Unison 

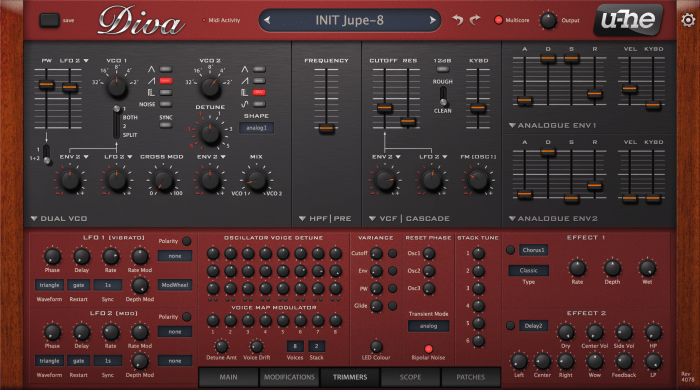
Let’s fatten our sound up by adding unison, so that each time you play a note two synthesizer voices are triggered instead of just one. Near the bottom of the Main tab is a knob labelled Stack. Set it to 2 to double the number of voices. That makes our sound more complex, but because both voices are tuned identically they will clash with each other. To remedy that, hop across to the Trimmers tab and hold down Shift while turning the the Stack Tune knob for voice 2 so that you can adjust its value in very small increments, and set it to 0.07. This puts our voices very slightly out of tune with each other to create a nice phasing effect. Switch back to the Main tab and in the Amplifier/Pan section set Pan Mod to 60% and choose StackIndex for the modulation source. Now each voice is positioned differently within the stereo field which gives the patch some stereo width.

step6a

step6b

7. Effects 

We have baked our cake, now lets add some icing! Diva has some great onboard effects and we will use its delay and reverb modules to add space and richness to our patch. Select Delay for the first effect slot, and turn the Side Vol knob to 17%, Left delay time to 4.0, Feedback to 20% and LP to 50%. When you hit a note on your midi keyboard you should hear distinct echoes following the main sound, which adds a rhythmic vibe to our instrument. Select Plate for the second effect slot to add a reverb after the delay. Set Dry to 100, Wet to 43, Damp to 85, Decay to 38 and Size to 90. Effects are very much a matter of preference, so feel free to experiment with the effect settings or use different effects entirely.

step7

Remaking the patch in Synth1 

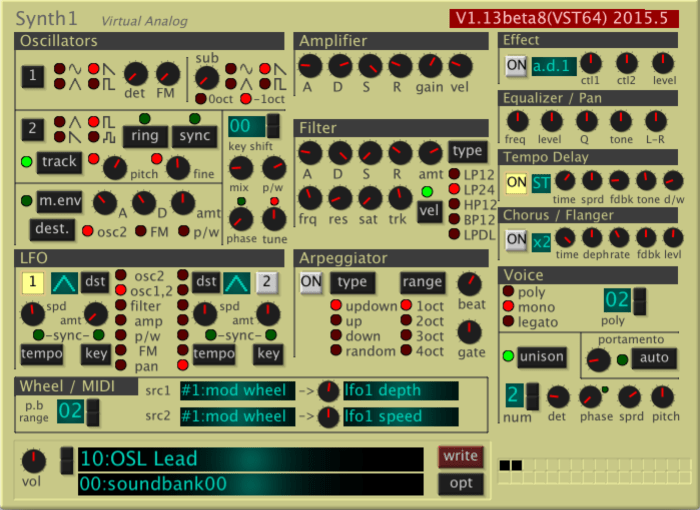
Even if you don’t own Diva it is straightforward to program a similar patch in most synthesisers. The screenshot below shows settings for a nearly identical lead in Synth1, a very impressive freeware synthesiser by Ichiro Toda. Synth1 doesn’t have an onboard reverb effect, but you can add your reverb of preference to your effects chain.

synth1


That wraps up the tutorial. Have fun ripping some blistering synth solos with your new lead patch!

-JN


TUTORIAL: Resonant Bass with Diva and PG8X

Welcome to another synthesis-for-synthwave tutorial! This week I’ll be making a Jupiter 8-style resonant bass patch using u-He’s incomparable Diva, and then remaking it with the excellent (and free) PG-8X, which emulates a Roland JX-8P. As always, my goal is to make synthesis accessible, though we’ll be adding some extra wrinkles in this time in order to emulate the “warmth” of vintage gear. For those who missed it, here is last week’s tutorial, where we made a Juno-style poly synth using TAL U-No-Lx. And if you want to hear how I use the patches I make, check out my latest release. -G 

Resonant Bass with Diva

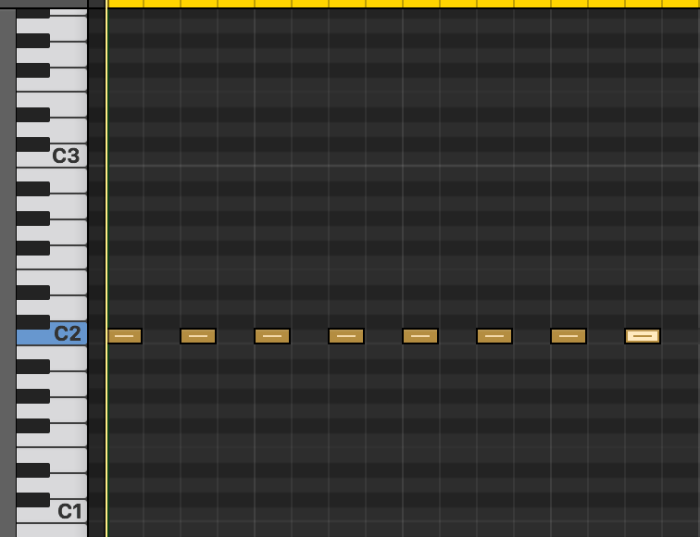
Before we begin, create a simple bass loop with 16th notes playing on the 1 and 3 (at 100 velocity):

Screen Shot 2017-09-24 at 3.48.41 PM

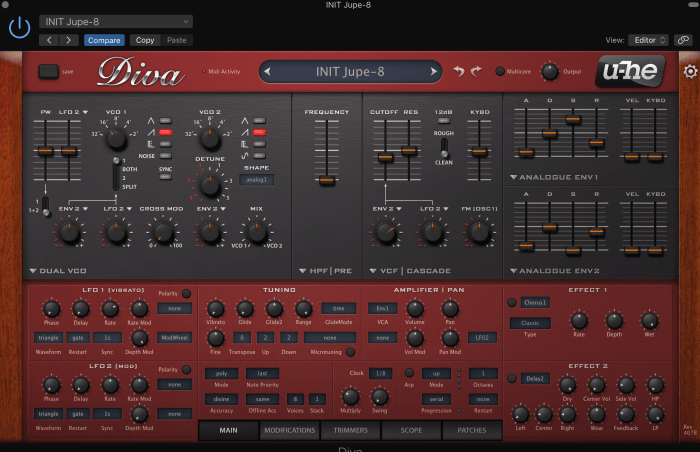
1. Load INIT-Jupe-8

Diva can model a number of different classic synths, as well as create hybrids by mixing and matching their parts. For this patch, we’ll be using the Jupiter 8 template. Basically this means Diva is modeling two voltage controlled oscillators, a voltage controlled filter and analog envelopes.

TUT Diva Start

2. Oscillator

Our bass patch is very aggressive, so we’ll stick to sawtooth waves. But we also want to take advantage of the Jupiter-8’s dual oscillator design. So to begin, drop VCO 1 down an octave (from 8 to 16). Then detune VCO 2 by 0.10. You can go either direction. I went to +0.10, but -0.10 will work as well.

TUT Diva OSC

What this does is create “fatness,” which is to say, a subjective sense of width. Try messing around with the detune settings. The more detuned the oscillators, the fatter the sound. But at a low setting, like 0.10, the oscillators still sound like they are playing the same note. Increase it too much, and they won’t.

3. Filter

Our sound is still quite harsh and grating, so let’s pull down the filter cutoff to 40%. Since we are making a resonant bass patch, we want to increase resonance to 50%. Next increase Keyboard tracking to 50% and ENV2 setting to 70%. (These determine how much of the sound is determined by how you play the keyboard and what your filter envelope settings are.) Now you can hear some squelch!

TUT Diva Filter

4. Envelopes (ADSR)

The aren’t labeled as such, but the top envelope modules the filter and the bottom envelope determines the amplitude. Use these settings:

Filter: A 0%; D 50%, S 80%, R 40%

Amplitude: A0%, D 50%, S 100%, R 30%

On the filter envelope, also raise the velocity sensitivity bar to 50%. That means the harder you hit the keys, the more the envelope will modulate the filter.

TUT Diva ADSR

5. Effects and “Trimmers” 

Now that we’ve got our basic sound, it’s time to give it some character. Thankfully, Diva offers plenty of tools for doing just that. To begin, let’s play around with the effects section. Like the Juno and JP synths, Diva features chorus as a standard effect. But it doesn’t really sound like a Roland chorus, and it doesn’t sound all that great on our patch. The tempo-synced delay, on the other hand, basically acts as a doubler–giving us an even fatter sound.

Next, navigate over to the “Trimmers” window. Now this may be my favorite set of features–controls that let you adjust the tuning and variance of individual voices, as well as mimic age and “oscillator drift” (i.e. the ability of VCOs to stay in tune, which compounds over time). These imperfections are what make vintage gear sound warm and characterful. And we can model them! To start, let’s raise the voice detune amount to 40% and voice drift to 70%. The effect is subtle but if you listen carefully, you can hear the voices coming just a touch apart from one another.

TUT Diva Trimmers

6. Final Touches

I like the squelch this sound gives, but for synthwave, it works even better if we increase the release a touch on the filter envelope, up to 40%. So let’s do that and call it a day!

TUT Diva Final touches

…and there you go! A classic resonant bass, perfect for acid-style filter sweeps. Just try raising the cutoff and see what happens. Or the filter envelope release…sounds nice, eh?


Remaking the Patch with PG-8X

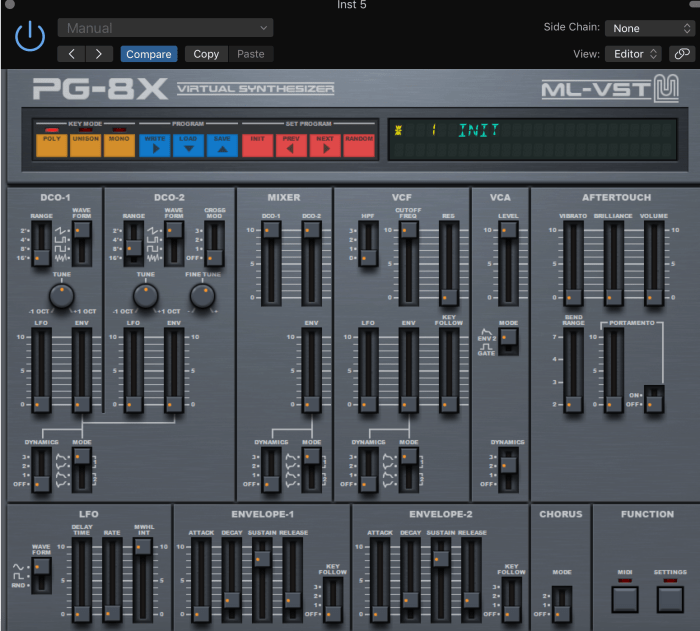
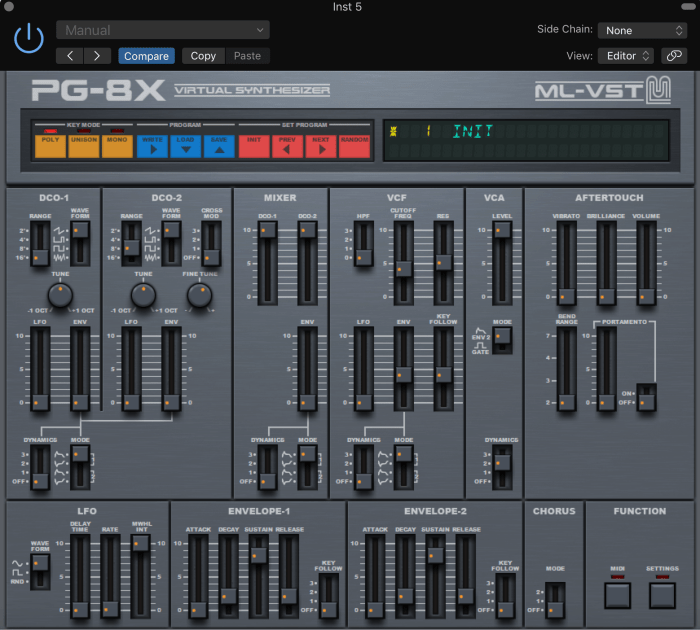
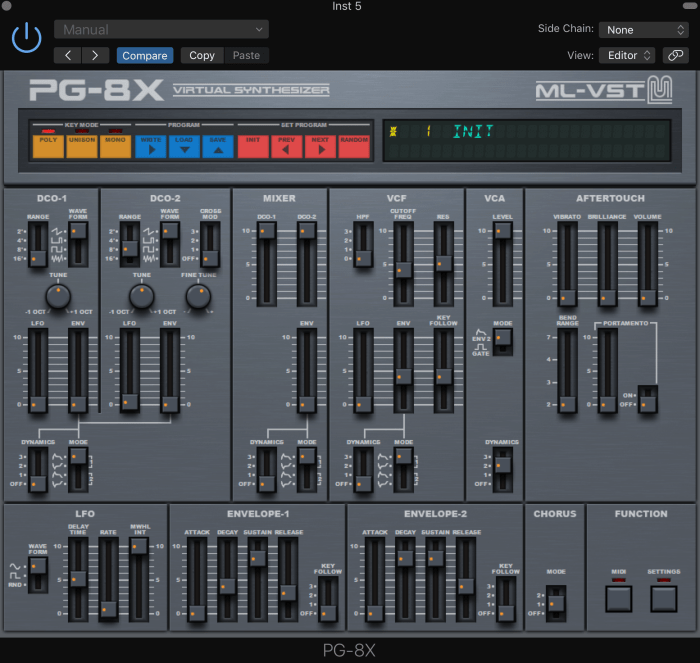
Our resonant bass patch sounds lovely in Diva, but you can make a version of this with any subtractive synth that has two oscillators. To demonstrate, I’ve chosen the excellent PG-8X, which is a free software emulation of the Roland JX-8P. Now, remember that the JX- synths were somewhat different from the Jupiters–actually, you could say they were a cross between the Jupiters and Junos. They had two oscillators, like the Jupiter 6/8, but they were DCOs and DCFs like the Juno 6/60/106.* And of course they did have that sweet Roland chorus. Even still, we should be able to get close to our Diva patch with PG8X.

*Note: a digitally-controlled oscillator is an analog oscillator where waves are reset by an electronic rather than an electrical pulse. It is still an analog synth.

1. Oscillator

First, in the mixer section, bring up the volume for OSC2. Then drop OSC1 down an octave (to 16) and detune OSC2 by 10% (0.10) using “Fine Tune.”

Screen Shot 2017-09-24 at 9.43.59 PM

2. Filter

Bring the cutoff down to 40% and resonance to 50%. Now raise the envelope modulation (ENV) to and KEY FOLLOW to 40% each.

Screen Shot 2017-09-24 at 9.46.29 PM

3. Envelopes (ADSR)

Envelope-1, which modulates the filter cutoff, should be as follows: A 0%, D 40%, S 80% and R 30%.

Envelope-1, which shapes the amplitude, should be as follows: A 0%, D 80%, S 80%, A 40%

Screen Shot 2017-09-24 at 9.48.51 PM

4. Effects and LFO

PG-8X does not have a delay, but we can introduce some fatness with chorus—and actually, the chorus sounds a lot better (and a lot more Roland) than the one on Diva. Let’s opt for CHORUS 1, which is a bit cleaner than CHORUS 2.

PG-8X also doesn’t have Diva’s options for emulating age and imperfections. But we can  capture that feel another way–by adding a touch of tuning wobble via the LFO. We want to effect to be subtle, but unfortunately PG-8X’s LFO is not very subtle. So we’ll need to be careful here. In the Oscillator section, set the LFO on OSC2 to 3. On the LFO section, set DELAY TIME to 50% and RATE to 5. That means the wobble won’t kick in right away, and when it does, the oscillation will be long and shallow. Our bass arp is made of 16th notes, so we’ll just end up with a touch of tuning wobble–exactly what we want!

Screen Shot 2017-09-25 at 9.14.04 AM


Comparing our Patches

If you have both synths, copy/paste our loop so that the Diva patch plays for 2 bars, then the PG-8X patch plays for 2 bars. You’ll immediately notice how much quieter PG-8X is, so you’ll need to adjust relative volume, either on faders or in Diva to properly compare. Once you’ve done that, you’ll see that the two sounds share a basic structure, but each have their own character. Our Diva patch is fatter, more resonant and definitely a lot more aggressive. Our PG-8X patch, though, has that pleasing Roland-in-the-80s character.

I like them both, but would use them in different scenarios. If there’s a lot of other stuff going on in a track, then I’d lean toward the PG-8X, as it will sit more comfortably in the mix. But if I’m doing a track with only a few elements, and which relies on the bass to drive things forward (e.g. your typical outrun track), then our Diva patch can carry a lot more weight. Both sound great with a bit of modulation, either using the filter or filter envelope. Try messing around with both–there are lots of possibilities!

Cosmopolis on Vinyl!

Cosmopolis is out today! Head on over to the bandcamp and you’ll see an added bonus: it’s available on vinyl as well as cassette and digital! Doing an LP has always been a dream of fine, so a huge thanks to Enzo and the TimeSlave Recordings crew for making it happen.

There are only 100 copies of the vinyl and 20 cassettes, so get ’em while they’re hot!

TUTORIAL: Classic Juno poly with TAL U-No-Lx

Welcome to my new tutorial series, in which I’ll walk you through some simple but handy techniques for making synthwave. I’m starting with sound design, using one of the most widely-used VSTs in the scene: TAL U-No-Lx. This tutorial is aimed primarily at those who are just learning (or want to learn) how to design their own patches or who are new to TAL U-No-Lx. But it may also be useful to more seasoned sound designers who, like me, can sometimes get set in their ways. 😛 

TAL U-No-Lx is a really handy and inexpensive Juno-60 emulation. It doesn’t sound exactly like the real thing, but it does sound quite good and also replicates the Juno’s intuitive workflow. So not only can you make great sounding patches with it, but it’s also an excellent learning tool for sound design.

In this tutorial, I’ll show you how to make a classic Juno-style polysynth patch with U-No-Lx, the kind that works for chords, leads and even bass.


1. Startup Patch

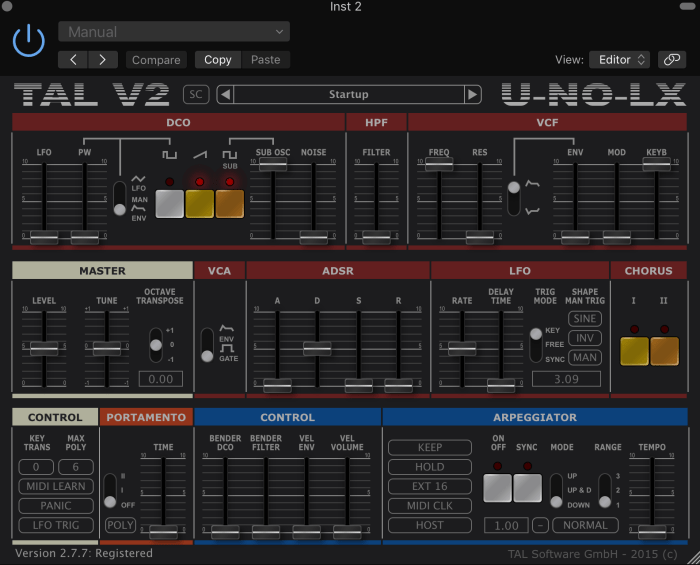
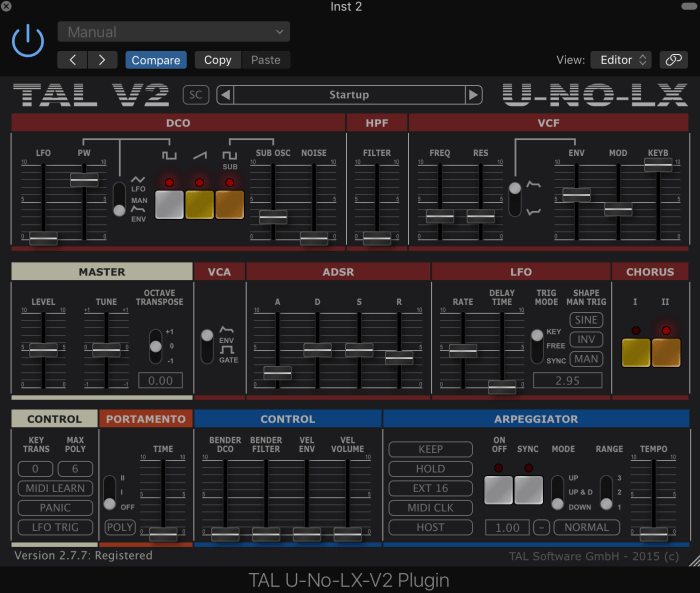
When you open U-No-Lx, this is what you’ll see:

Screen Shot 2017-09-18 at 9.44.45 AM.png

Like the Junos, U-No-Lx features one digitally-controlled oscillator (DCO), but allows you to layer two waveforms (one saw and one square), then adjust the shape of the square wave via pulse width modulation (PWM). There is also a sub-oscillator. What you see/hear right now is basically a saw wave with no modulation, but with the sub oscillator turned up to 100%.

2. Adding a second waveform

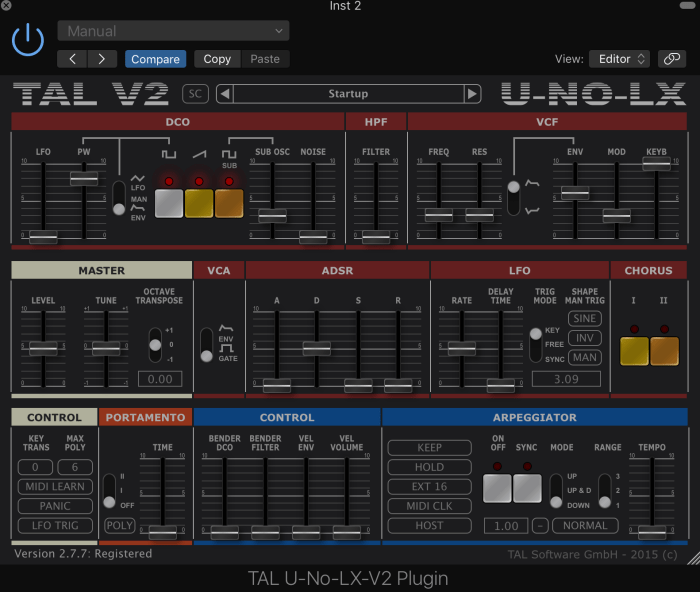
Let’s put the sub oscillator to the side for now and concentrate on adding a square wave to the equation. Click on square and then play around with the PWM settings. What you are doing is adjusting the width of the square. I like the way it sounds at about 80%. So let’s do that, and also bring the sub oscillator back in, but keep it subtle for now—at 30%.

Screen Shot 2017-09-18 at 9.50.05 AM

3. Adjust the filter settings.

Feels like we’re getting somewhere, right? Even so, our sound is still a bit harsh and reedy. So let’s start to address that by adjusting the filter settings. Bring the cutoff and resonance down to 30% each, then raise the ENV to 60%. Now you can hear the envelope modulating the filter. It’s subtle but it’s there. Let’s also bring the MOD slider up to 30%. This will add modulation of the filter cutoff via the low frequency oscillator (LFO).

Screen Shot 2017-09-18 at 9.53.58 AM

4. Adjust the envelope (ADSR)

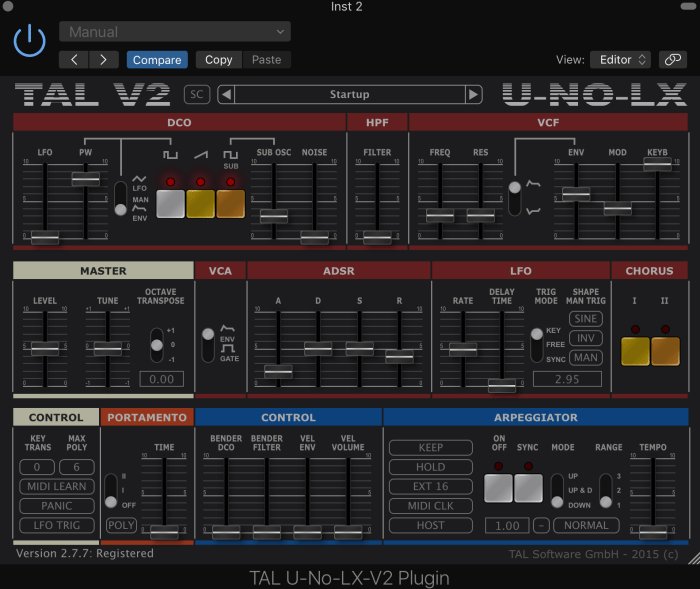
U-No-Lx defaults to gate for the envelope, but if we really want to make this sound shine, we need to set it to ENV. After doing that, we can adjust the ADSR. Since U-No-Lx has a single envelope, it’s going to modulate both amplitude and filter. So let’s set attack to 20%, decay and sustain to 50% and release to 40%.

(After doing so, I also raised the MOD slider to 40%.)

Screen Shot 2017-09-18 at 10.00.06 AM

5. Adding chorus

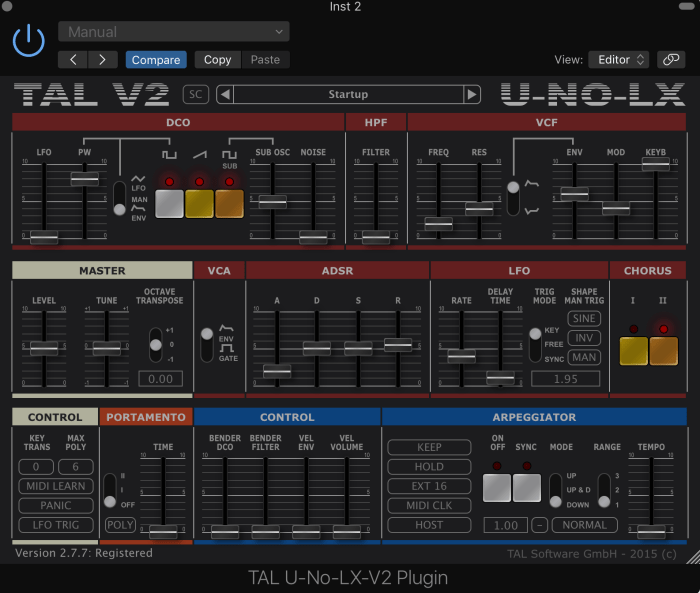
Chorus is the Juno’s secret sauce, and U-No-Lx does a good job reproducing Roland’s ultra-lush chorus. I prefer chorus 2 for this patch. So let’s add that:

Screen Shot 2017-09-18 at 10.02.05 AM

(Hint: you can also double chorus 1 and 2.)

7. Final adjustments

Now that we have our basic patch, we can adjust the settings to our needs and preferences. I’d like a hint more of release. I’m putting it just north of 50%. And I want to lower the LFO rate while also adding a hint of predelay (which determines how quickly the LFO kicks in). I’m bringing LFO RATE down to 40% and DELAY TIME up to 10%. I’m also going to add some more sub to give the sound more body—to 50%. Finally, I’m going to lower the filter cutoff to 20% and raise resonance to 40%, which brings out the modulation a bit more.

Screen Shot 2017-09-18 at 10.07.33 AM

And there you go! A classic Juno polysynth patch that sounds great as bass, chords or lead. (Though you might want to reduce the release a touch when using it for bass).

-G